For our first block of CMGT Programming year 2 here at BUAS, we were tasked to create a game engine.
Here I would like to take you along on how I created a game engine (mostly) from scratch. Since this blog post is a lot bigger than my normal ones, I will provide you with an Index, so feel free to skip to any parts that interest you!
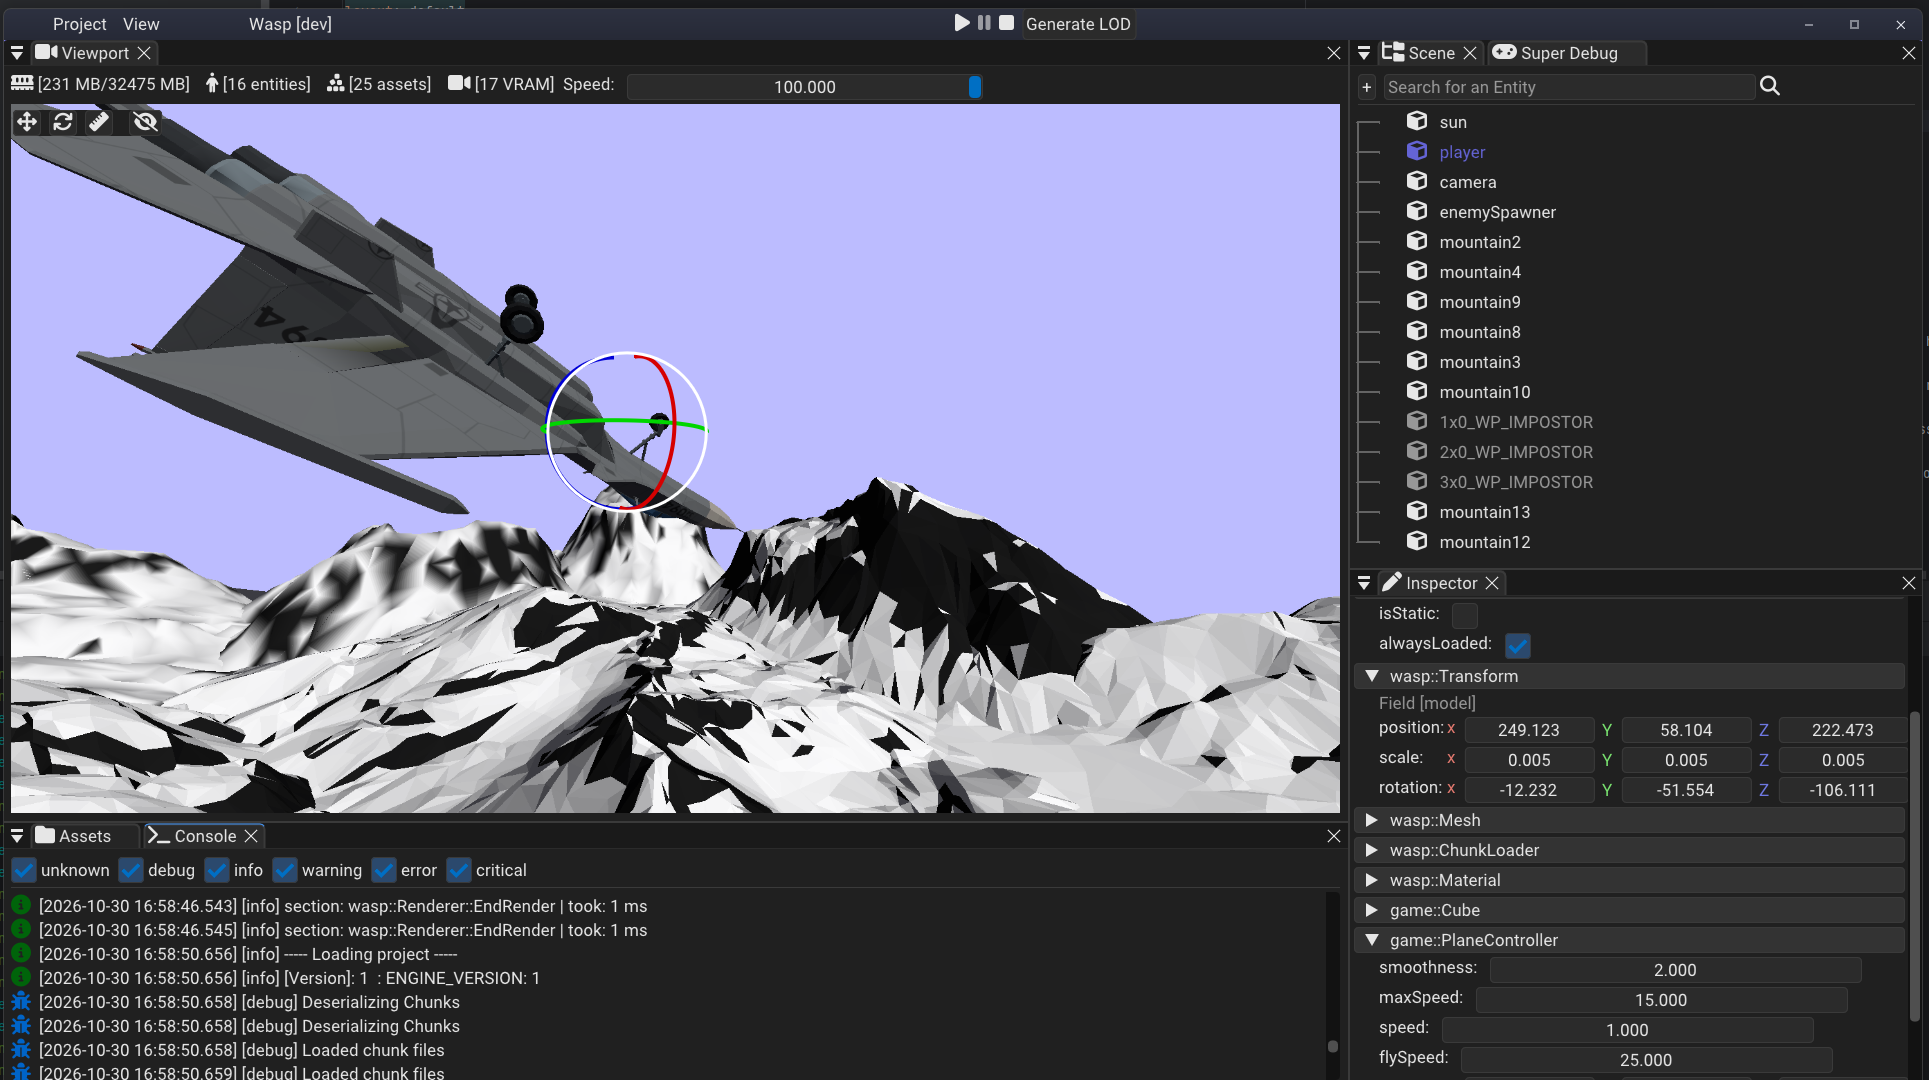 Screenshot of my engine & editor in action!
Index:
- Requirements
- My plans and Ideas
- Main Engine Architecture
- Application & Game setup
- Input system
- ECS Implementation & Flecs
- FileSystem
- Reflection
- Serialization
- GLTF Loading
- Assets & AssetSystem
- Editor
- World Streaming
- JobSystem
- Conclusion
Requirements
This year we were allowed to pick between:
- Creating a game engine
- Creating a PS5 PBR renderer.
- Create 2D physics & Path-finding.
I went for the game engine route (how surprising I know). The goal of the engine module was to create a multi-platform game engine and make a small demo with it. When I say multi-platform I really mean PS5 and Windows.
The Engine requirements were as follows:
- ECS integration.
- Debug Tools.
- FileSystem & AssetSystem.
- Reflection & Serialization.
- Level Editor & game packaging.
The Engine Module was provided with a small rendering library that had backends for Vulkan and PS5. It was really simple with it basically going as:
c++
1///Pseudo CODE, not the actual api
2xsr::render_mesh(mesh, ...);
(this is also why I won’t cover anything really rendering related, since I just used the provided library for it)
Now this is interesting because the previous years had to build their engines on top of (very bare bones version of) BEE (The Internal Buas game engine). Our teacher later revealed that he did that to force everybody to make their own architecture choices instead of building off of BEE’s choices.
My plans and Ideas:
In my first week I wrote the following list as points I want to add:
- Multi-threaded main loop.
- Distance based asset / world streaming.
- Visual scripting (like UE’s blueprints).
This is incredibly ambitious adding on top of what I already have to make and having an 8 week time frame to make it.
And I don’t think anybody is shocked that I only ended up being able to do half of those features. But it wasn’t actually because of the scope that I cut back on my feature scope. I became quite ill in the first weeks, so I had to rest a lot to get better.
The first thing to go was Visual scripting, since it was the one least likely to be doable. Instead I will pick visual scripting as my research topic for next block!
I also did not multithread the entire main loop, since the main loop is so small there wouldn’t be any benefit for all of the extra difficulty it would add. I did multithread the world streaming, allowing chunks to load on separate threads.
Main Engine Architecture
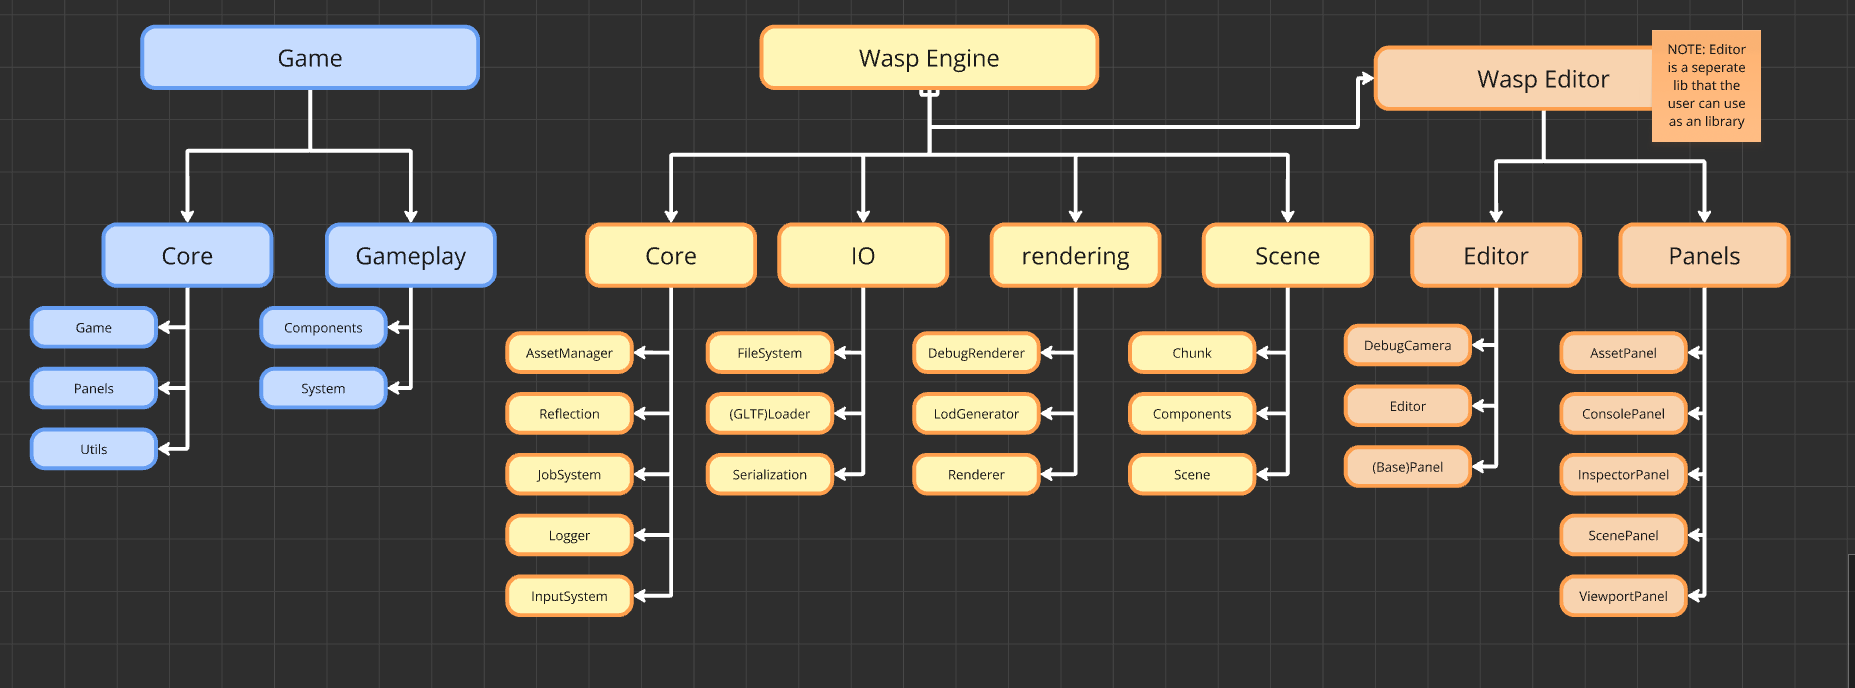 Visual graph of my architecture
Previously if I made an engine I would go with the “Runtime.lib, Player.exe, Editor.exe” architecture. What I mean with that is that you have a shared library that is your main engine. Then you have a player that loads a project and runs it and an editor that loads a project and edits it.
Now this is a bit more difficult to achieve if you don’t have any scripting. You can still do it by making the game code a DLL and have the Editor or Player load, which is something I’ve seen some of my peers do. However I did not find it worth the trouble for this project.
I went for the “Runtime.lib, Editor.lib, Game.exe”, with instead of the editor being a separate executable it is just a library that the game can integrate.
Application & Game setup
I created the Application class as something the user should inherit from.
It acts as a central point from where the engine can execute its logic and allows the user to add their own logic via inheritance.
Input System
For our first week’s output we had to create a demo that had a mesh that you can move around via input. Since I would need input anyways, I decided to bite the bullet and create a more “proper” input system rather than my previous:
c++
1if (IsKeyPressed(KEY_W)) {
2    MoveForward();
3}
Unreal’s Enhanced Input System
I used Unreal in the previous year and one of the things that I was quite fond of was the input system. Now we used the “Enhanced input system”, which looks like this:
c++
 1void AFooBar::SetupPlayerInputComponent(UInputComponent* PlayerInputComponent)
 2{
 3	UEnhancedInputComponent* Input = Cast<UEnhancedInputComponent>(PlayerInputComponent);
 4	// You can bind to any of the trigger events here by changing the "ETriggerEvent" enum value
 5	Input->BindAction(AimingInputAction, ETriggerEvent::Triggered, this, &AFooBar::SomeCallbackFunc);
 6}
 7
 8void AFooBar::SomeCallbackFunc(const FInputActionInstance& Instance)
 9{
10	// Get the value of the Input Action for whatever type you want here...
11	FVector VectorValue = Instance.GetValue().Get<FVector>();
12	FVector2D 2DAxisValue = Instance.GetValue().Get<FVector2D>();
13	float FloatValue = Instance.GetValue().Get<float>();
14	bool BoolValue = Instance.GetValue().Get<bool>();
15
16	// Do your cool stuff here!
17}
The advantage of a system like this is that you can have multiple inputs for 1 action. So moving with WASD and a joystick can be the same action.
Another nice thing about this approach is that you can set your callback to a specific instance:
c++
1                                                              //-------------------------------//
2Input->BindAction(AimingInputAction, ETriggerEvent::Triggered, this, &AFooBar::SomeCallbackFunc);
Then how you get your input values is also rather nice, being able to cast them to booleans, floats and Vectors is nice. Unreal allows you to add modifiers to your actions, which are incredibly handy and powerful, but it is something I did not end up adding.
My implementation
First I needed a way to store what inputs an action would have. So I created this:
c++
 1struct InputKey {
 2    union {
 3        xsr::device::key key;
 4        xsr::device::mouse_button mouseButton;
 5        xsr::device::gamepad_button gamepadButton;
 6        GamepadAxis gamepadAxis; // GamepadAxis is just an enum like LEFT_STICK, RIGHT_STICK, etc
 7    } as;
 8    InputType type{InputType::KEY};
 9
10    InputKey(xsr::device::key key);
11    InputKey(xsr::device::mouse_button mouseButton);
12    InputKey(xsr::device::gamepad_button gamepadButton);
13    InputKey(GamepadAxis gamepadAxis);
14};
Now I know that we aren’t supposed to use union anymore, but this way we can do:
c++
1InputKey ik;
2if (IsKeyPressed(ik.as.key)) {
3    //do something
4}
And I really like this object.as.thing syntax so I am still using unions.
Next is the callbacks, we can achieve this by using lambdas:
c++
1using InputCallbackFn = std::function<void(void* instance, const InputAction& action)>;
2
3struct InputCallback {
4    void* instance{nullptr};
5    InputCallbackFn callback;
6};
Finally we need a place where we can store the InputKeys and InputCallbacks.
c++
 1class InputAction {
 2    public:
 3        //...//
 4
 5        void Call() const;
 6        bool IsActivated();
 7
 8    private:
 9
10        union {
11            float scalar;
12            glm::vec2 vector2;
13        } _value; //Note: Now here is a good use case to use std::variant.
14
15        std::vector<InputCallback> _listeners{};
16        std::vector<InputKey> _keys{};
17};
Then for the logic side of things we can do the following:
c++
 1bool InputAction::IsActivated() {
 2    bool active = false;
 3
 4    _value.scalar = 0.f;
 5    _value.vector2 = glm::vec2{0.f};
 6
 7    for (const InputKey& key : _keys) {
 8        switch (key.type) {
 9
10            case InputType::KEY: {
11                if (xsr::device::is_key_down(key.as.key)) {
12                    if (_type == InputActionValueType::VEC2)
13                        Input::Internal::ApplyKeyDirection(key.as.key, _value.vector2); //turns the WASD and arrow keys into a glm::vec2
14                    else
15                        _value.scalar = 1.0f;
16
17                    active = true;
18                }
19
20                break;
21            }
22
23            //The other InputTypes
24        }
25    }
26
27    return active;
28}
29
30void InputAction::Call() const
31{
32    for (const auto& [instance, listener] : _listeners)
33    {
34        listener(instance, *this);
35    }
36}
As you have noticed, this does not yet look like the UE Enhanced Input api, which is true. But this is actually our "backend", to complete the API I want, I add this final layer on top.
c++
 1//Main Api entry point of the Input api.
 2namespace Input {
 3
 4namespace Internal {
 5        void AddInput(const std::shared_ptr<InputAction> &action,const InputCallback& callback);
 6    }
 7
 8    //Needs to be called every frame
 9    void ProcessInput();
10    std::shared_ptr<InputAction> GetAction(const std::string& name);
11
12    //Adds a new Input Callback to the action.
13    template<typename T>
14    void AddInput(const std::shared_ptr<InputAction>& action, T* instance, void(T::*c)(const InputAction&));
15    void AddInput(const std::shared_ptr<InputAction>& action, void(*c)(const InputAction&));
16}
c++
 1template<typename T>
 2void wasp::Input::AddInput(const std::shared_ptr<InputAction>& action, T* instance, void(T::*c)(const InputAction&)) {
 3    WP_ASSERT(action != nullptr, "Action cannot be Null");
 4
 5    InputCallback inputCallback {
 6        instance,
 7    };
 8
 9    inputCallback.callback = [c](void* instance, const InputAction& action) {
10        (static_cast<T*>(instance)->*c)(action);
11    };
12
13
14    Internal::AddInput(action, inputCallback);
15}
16
17///---- Input.cpp ----
18void wasp::Input::Internal::AddInput(const std::shared_ptr<InputAction>& action, const InputCallback& callback)
19{
20    WP_ASSERT(action != nullptr, "Action must be valid to bind an input to it!");
21    if (!action) return;
22
23    action->AddListener(std::move(callback));
24}
Fun little trick!
One thing that I really like about this system is that WASD and the arrow keys can get automatically translated to a vec2. To do this I first check if a key can be a directional key and then apply a Direction, I do this via this hardcoded function:
c++
 1bool IsDirectionalKey(const xsr::device::key key)
 2{
 3    switch (key)
 4    {
 5        case xsr::device::key::w:
 6        case xsr::device::key::a:
 7        case xsr::device::key::s:
 8        case xsr::device::key::d:
 9        case xsr::device::key::up:
10        case xsr::device::key::left:
11        case xsr::device::key::down:
12        case xsr::device::key::right:
13            return true;
14
15        default:
16            return false;
17    }
18}
19
20void ApplyKeyDirection(xsr::device::key key, glm::vec2& out)
21{
22    switch (key)
23    {
24        case xsr::device::key::w:
25            out.y = 1;
26            break;
27        case xsr::device::key::a:
28            out.x = -1;
29            break;
30        case xsr::device::key::s:
31            out.y = -1;
32            break;
33        case xsr::device::key::d:
34            out.x = 1;
35            break;
36
37        //etc...
38        default:
39            break;
40    }
41}
Tip: You could make this better by making this data-driven instead of hardcoded. Put all of the directional keys in a hashmap and store a direction, voilà!
ECS Implementation
The second week was all about integrating an Entity Component System into our engines. Now we were supposed to use the Entt library, however I quickly spotted a problem with the library.
You see, I want to add Scripting into my engine, which means that the user can define their own Components. This means that I don’t know the Components at compile time and Entt (as far as I could see) has a heavily templated api, which requires for you to know the type at compile time.
Example of the Entt API.
1struct Position;
2
3entt::registry registry{};
4
5const auto entity = registry.create();
6registry.emplace<Position>(entity, Position{1, 2});
7              // ^^^^^^^^ this is the issue, what if I don't have access to the type?
I would not be surprised if you can get around this restriction, but I couldn’t find any solution in time.
This meant that I needed an ECS library that allowed me to be free from templates, which led me to Flecs. The thing is that Flecs has both a C++ and C api and since templates don’t exist in C, it means that I am not tied down to templates :D.
Example of the C++ Flecs API
1struct Position;
2
3flecs::world world{};
4
5auto e = world.entity();
6e.add<Position>();
Example of the C Flecs API
 1struct Position;
 2
 3ecs_world_t *world = ecs_init();
 4ecs_entity_t e = ecs_entity(world, {.name = "Entity" })
 5
 6ECS_COMPONENT(world, Position);
 7
 8ecs_add(world, e, Position);
 9
10ecs_fini(world);
As you can see the C api is a bit more verbose (shocker I know), but it gives us a lot more control!
Abstracting Flecs
I felt the need to abstract Flecs because we are using the C api. For convenience sake I still want to give the option of using templates so here is how:
First I create a “base function”, this function is not dependent on any templates.
Then I add a templated function which will just call the underlying base function.
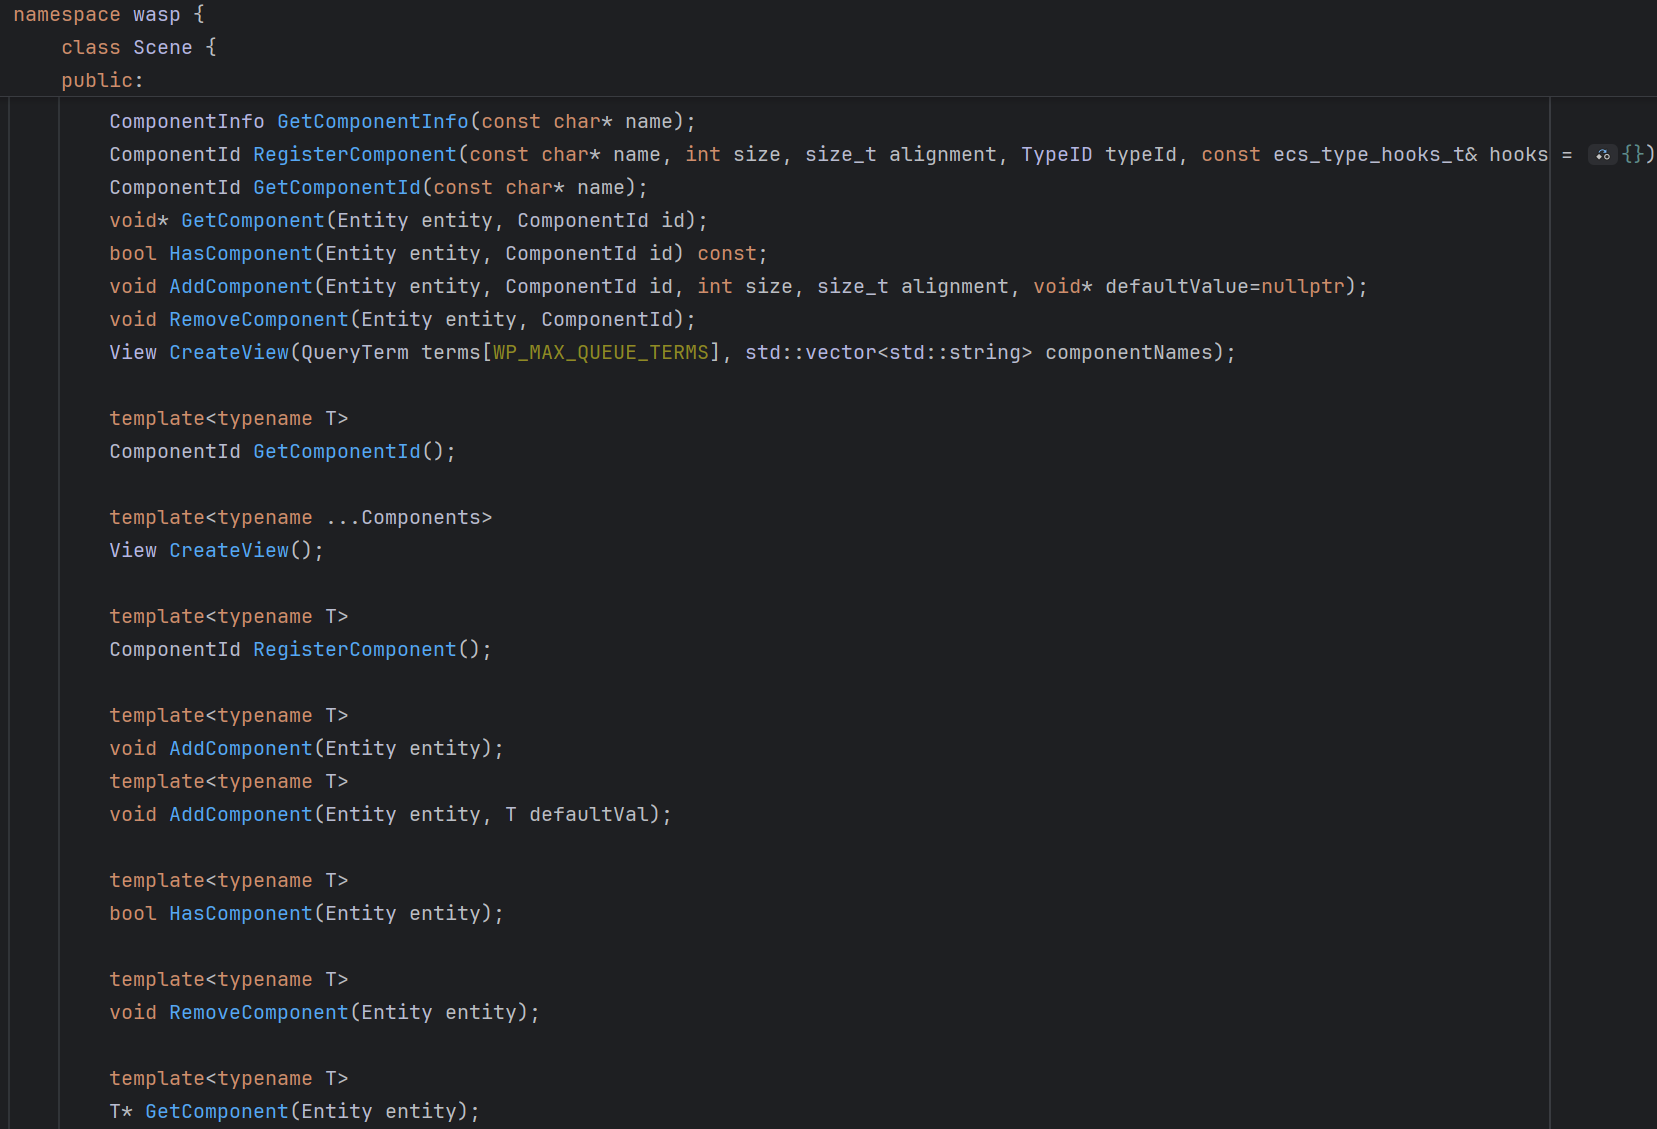
For example an implementation of the templated function:
c++
1template<typename T>
2bool Scene::HasComponent(Entity entity) {
3    std::string_view name = TypeInfo<T>::GetTypeName();
4
5    const ComponentInfo& info = _componentsRegistry[std::string(name.begin(), name.end()).c_str()];
6
7    return HasComponent(entity, info.id); // Calls the bool HasComponent(Entity entity, ComponentId id);
8}
And then the core function would look like:
c++
1bool wasp::Scene::HasComponent(Entity entity, ComponentId id) const {
2    return ecs_has_id(_world, entity, id);
3}
The rest of my scene class is just a layer on top of Flecs and nothing special.
FileSystem
My file system is an incredibly simple layer on top of the std::filesystem.
With me disabling / enabling certain features on different platforms.
c++
 1using OnFileComplete = void(*)(void* userData);
 2
 3namespace FileSystem {
 4    bool IsFile(const std::string& path);
 5    bool IsFolder(const std::string& path);
 6    bool FileExists(const std::string& path);
 7    std::string GetFileExtension(const std::string& path);
 8    std::string GetFileName(const std::string& path);
 9    std::string GetFolderName(const std::string& path);
10    size_t GetFileSize(const std::string& path);
11
12    void RenameFile(const std::string& path, const std::string& newName);
13    void MoveFile(const std::string& src, const std::string& dest);
14    void CopyFile(const std::string& src, const std::string& dest);
15
16    void GetFilesInDirectory(const std::string& path, std::vector<std::string>& out);
17
18    void ReadFileAsync(Counter* counter, const std::string& path, void* dest, size_t sizeofDest, size_t* endOfFile, OnFileComplete onComplete, void* userData);
19    void WriteFileAsync(Counter* counter, const std::string& path, void* dest, size_t sizeofDest, size_t* endOfFile, OnFileComplete onComplete, void* userData);
20
21    void ReadFile(const std::string& path, void* dest, size_t sizeofDest, size_t* endOfFile);
22    void WriteFile(const std::string& path, void* dest, size_t sizeofDest, size_t* endOfFile);
23}
As you can see, most of these functions can be directly tied to an std::filesystem function.
The only thing that is special here is the ReadFileAsync and WriteFileAsync, which are built on top of my job system.
Improvements
«««< HEAD
If I had to redo it for the future the main things I would like to add are:
======= If I had to redo it for the future the main thins I would like to add:
e956cf0 (Fix final final) Wildcards:
I did not add wildcards in this engine since I did not really need them (see AssetSystem chapter). But being able to give[assets]/awesomeModel.wppakas a path would be really nice.
Reflection
One of my personal favorite parts of this engine is the reflection system. With it being very much a watered down version of Skore’s Reflection system.
Here I would like to explain how Skore I did it!
Why ?
Reflection is an incredibly powerful concept, with a program being able to examine and modify its own structure whilst it runs.
This becomes incredibly useful for stuff like Serialization where instead of having to write a save function for every savable object. We can instead write 1 generic save function which uses the reflection system to know what data and fields to save.
TypeInfo
First thing we need is the ability to get some information about any type, like its size, alignment and name.
C++ already gives us the sizeof(T) and alignof(T), but we have to get the name ourselves.
Note: C++ has the typeid(T).name() but it is very inconsistent across platforms, so I don’t recommend it.
C++ compilers have this fun little macro called `__PRETTY_FUNCTION__` (Note: this one is only for clang and gcc, msvc uses a different keyword).
This gives us the name of the current function.
So if we were to have a function like:
c++
1template<typename T>
2constexpr auto StrippedTypeName() {
3    std::string_view prettyFunction = __PRETTY_FUNCTION__;
4    //prettyFunction: "auto StrippedTypeName() [T = MyAwesomeType]"
5}
Then we can extract the Type name from the current function:
c++
1//Note: we don't use the __PRETTY_FUNCTION__ directly since it's compiler specific, the prefix and suffix is also compiler specific.
2template<typename T>
3constexpr auto StrippedTypeName() {
4    std::string_view prettyFunction = PRETTY_FUNCTION;
5    size_t first = prettyFunction.find_first_of(PRETTY_FUNCTION_PREFIX) + 1;
6    std::string_view value = prettyFunction.substr(first, prettyFunction.find_last_of(PRETTY_FUNCTION_SUFFIX) - first);
7
8    return value;
9}
Then if we would like an Id for our type we can simply hash our name.
Reflecting Types (both native and non-native)
One big plus of the way we have set up our reflection system is that it can handle both native and non-native types. This is really useful for scripting, since any system that uses reflection can handle any non-native type as long as it’s reflected.
So how do we achieve this? Well by generating functions! Imagine this scenario:
c++
 1struct Foo {
 2    float data{1.0f};
 3}
 4
 5//Notice how our arguments are just 2 void*, no mention of any templates or types.
 6void GetDataFromStruct(void* instance, void* out) {
 7    Foo* inst = static_cast<Foo*>(instance);
 8    *static_cast<float*>(out) = inst->data;
 9}
10
11int main() {
12    Foo inst{};
13    float out = 2.0f;
14
15    GetDataFromStruct(&inst, &out);
16
17    //out = 1.0f;
18    return 0;
19}
Now if we were to add templates to it.
c++
 1struct Foo {
 2    float data{1.0f};
 3}
 4
 5template<typename Type, typename ReturnType, auto MemberPointer>
 6struct Helper {
 7
 8    static void Get(void* instance, void* out) {
 9        Type* inst = static_cast<Type*>(instance);
10        *static_cast<ReturnType*>(out) = inst->*MemberPointer;
11    }
12};
13
14int main() {
15    Foo inst{};
16    float out = 2.0f;
17
18    Helper<Foo, float, &Foo::data>::Get(&inst, &out);
19
20    //out = 1.0f;
21    return 0;
22}
Notice how our Helper::Get and GetDataFromStruct have the exact same signature!
Well we can abuse that little fact!
So if we want to register something, we just generate the functions we need for it!
In fact all that I really store is just function pointers.
Take a look at my ReflectField class.
c++
 1class ReflectField {
 2    public:
 3        friend class ReflectFieldBuilder;
 4
 5        using FnGet = void(*)(const ReflectField* field, const void* instance, void* dest, size_t dest_size);
 6        using FnSet = void(*)(const ReflectField* field, void* instance, const void* src, size_t src_size);
 7        using FnSerialize = void(*)(const ReflectField* field, Writer& writer, const void* src);
 8        using FnDeserialize = void(*)(const ReflectField* field, Reader& reader, void* dest);
 9
10        explicit ReflectField(std::string name) : _name(std::move(name)) {};
11
12        void Get(const void* instance, void* dest, size_t dest_size) const;
13        void Set(void* instance, const void* src, size_t src_size) const;
14
15        TypeID GetTypeId() const;
16        void Serialize(Writer& writer, const void* instance) const;
17        void Deserialize(Reader& reader, void* instance) const;
18
19        template<typename T>
20        void Get(const void* instance, T& value) const
21        {
22            Get(instance, &value, sizeof(T));
23        }
24
25        template<typename T>
26        void Set(void* instance, const T& value)
27        {
28            Set(instance, &value, sizeof(T));
29        }
30
31        const char* GetName() const {
32            return _name.c_str();
33        }
34
35    private:
36        std::string _name{""};
37        TypeID _typeid{0};
38
39        FnGet _get{nullptr};
40        FnSet _set{nullptr};
41        FnSerialize _serialize{nullptr};
42        FnDeserialize _deserialize{nullptr};
43    };
As you can see all that I really store is function pointers! Now sadly explaining my entire reflection system deserves its own blog post, but it is all built on this core concept.
Serialization
Now that we have reflection, making serialization will be a ““piece of cake””.
For our serialization system I wanted the following things:
- Serialize anything that is reflected.
- Deserialize anything that is reflected.
- Support for both
std::vectorandstd::unordered_map. - Support at least the json and binary format.
Again just like how my reflection was taken inspired by Skore, the same goes for my Serialization system.
Although this time around I added some small extra things and bug fixes.
Reader and Writer
In order to support that last criterion, I first create a generic interface for both a Writer and Reader.
Then we can create implementations for both of them in both Json and Binary.
This is so that the rest of the serialization system can just use the generic interfaces without having to worry about which format we are writing to.
Serialization
 1class Writer {
 2public:
 3    WP_DEFAULT_CONSTRUCTOR(Writer);
 4    Writer() = default;
 5    virtual ~Writer() = default;
 6
 7    virtual void WriteBool(std::string_view name, bool value) = 0;
 8    virtual void WriteInt(std::string_view name, int value) = 0;
 9    virtual void WriteUint(std::string_view name, unsigned int value) = 0;
10    virtual void WriteFloat(std::string_view name, float value) = 0;
11    virtual void WriteString(std::string_view name, const std::string& value) = 0;
12    virtual void WriteBuffer(std::string_view name, const void* buffer, size_t size) = 0;
13
14    virtual void BeginArray() = 0;
15    virtual void BeginArray(std::string_view name) = 0;
16    virtual void EndArray() = 0;
17
18    virtual void BeginMap() = 0;
19    virtual void BeginMap(std::string_view name) = 0;
20    virtual void EndMap() = 0;
21
22    virtual void AddBool(bool value) = 0;
23    virtual void AddInt(int value) = 0;
24    virtual void AddUint(unsigned int value) = 0;
25    virtual void AddFloat(float value) = 0;
26    virtual void AddString(const std::string& value) = 0;
27    virtual void AddBuffer(const void* data, size_t size) = 0;
28};
29
30class Reader {
31public:
32    WP_DEFAULT_CONSTRUCTOR(Reader);
33    Reader() = default;
34    virtual ~Reader() = default;
35
36    virtual bool ReadBool(std::string_view name) = 0;
37    virtual int ReadInt(std::string_view name) = 0;
38    virtual unsigned int ReadUint(std::string_view name) = 0;
39    virtual float ReadFloat(std::string_view name) = 0;
40    virtual std::string ReadString(std::string_view name) = 0;
41
42    virtual bool GetBool() = 0;
43    virtual int GetInt() = 0;
44    virtual unsigned int GetUint() = 0;
45    virtual float GetFloat() = 0;
46    virtual std::string GetString() = 0;
47    virtual std::vector<unsigned char> GetBuffer() = 0;
48
49    virtual void BeginArray() = 0;
50    virtual bool BeginArray(std::string_view name) = 0;
51    virtual bool NextArrayEntry() = 0;
52    virtual void EndArray() = 0;
53
54    virtual void BeginMap() = 0;
55    virtual bool BeginMap(std::string_view name) = 0;
56    virtual bool NextMapEntry() = 0;
57    virtual std::string GetCurrentKey() = 0;
58    virtual void EndMap() = 0;
59};
Serialization Reflection data
Let’s say we have this scenario:
c++
1template<typename Type, typename Owner, auto MemberPointer>
2class NativeReflectField {
3public:
4    //...
5    static void Serialize(Writer& writer, void* instance) {
6        //How are we gonna call  writer.WriteFloat() ?
7    }
8}
How can I call the writer.WriteFloat function? Or what if it’s an Integer.
I would like to just do:
c++
1    static void Serialize(Writer& writer, void* instance) {
2        Serialize<float>(writer, static_cast<Owner*>(instance)->*MemberPointer);
3    }
We can achieve this with explicit template specialization. To put it in perspective here is a very simple example:
c++
 1template<typename T, typename = void>
 2struct Foo {
 3    static void Call() {
 4        std::cout << "Default\n";
 5    }
 6};
 7
 8template<>
 9struct Foo<float> {
10    static void Call() {
11        std::cout << "Float\n";
12    }
13};
14template<>
15struct Foo<int> {
16    static void Call() {
17        std::cout << "int\n";
18    }
19};
20
21int main() {
22    Foo<double>::Call(); // Default
23    Foo<float>::Call(); // Float
24    Foo<int>::Call(); // int
25
26    return 0;
27}
As you can see we can specify specific implementations for a float and integer, which is exactly what we need! And in the default case we can just treat the type as a map and loop over its fields via the reflection system:
c++
 1//For any field that we don't have a custom implementation, we treat them as maps.
 2template<typename T, typename = void>
 3struct SerializeField {
 4    constexpr static bool hasCustomImpl = false;
 5
 6    static void Write(Writer& writer, std::string_view name, const T* value) {
 7        if (ReflectType* type = Serialization::FindTypeToSerialize(TypeInfo<T>::ID())) {
 8            writer.BeginMap(name);
 9            Serialization::Serialize(type, writer, value);
10            writer.EndMap();
11        }
12    }
13    static void Get(Reader& reader, T* value) {
14        if (ReflectType* type = Serialization::FindTypeToSerialize(TypeInfo<T>::ID())) {
15            reader.BeginMap();
16            Serialization::Deserialize(type, reader, value);
17            reader.EndMap();
18        }
19    }
20    static void Add(Writer& writer, const T* value) {
21        if (ReflectType* type = Serialization::FindTypeToSerialize(TypeInfo<T>::ID())) {
22            writer.BeginMap();
23            Serialization::Serialize(type, writer, value);
24            writer.EndMap();
25        }
26    }
27};
28
29//Example of a custom implementation
30template<>
31struct SerializeField<float> {
32    constexpr static bool hasCustomImpl = true;
33
34    static void Write(Writer& writer, std::string_view name, const float* value) {
35        writer.WriteFloat(name, *value);
36    }
37
38    static void Get(Reader& reader, float* value) {
39        *value = reader.GetFloat();
40    }
41
42    static void Add(Writer& writer, const float* value) {
43        writer.AddFloat(*value);
44    }
45};
Now we can create the following function:
c++
1template<typename Type, typename Owner, auto MemberPointer>
2class NativeReflectField {
3public:
4    //...
5    static void Serialize(Writer& writer, void* instance) {
6        SerializeField<Type>::Write(writer, name, &(static_cast<const Owner*>(instance)->*MemberPointer));
7    }
8}
And tada! Serialization!
GLTF loading
This block we were specifically required to support the GLTF format.
Most of us (including myself) went with the TinyGLTF library.
But I do not recommend that library, instead I personally recommend the FastGLTF library, which I find much easier to use. But for compatibility reasons I had to stick to tinygltf this time around.
Unlike most of my peers I only load GLTFs during create time (when my editor is running) and then convert them to the internal format.
I also did not use the latest version of tinygltf, instead I went with V3, so that I could use the C++ api.
Now I converted my GLTFs to the following format:
c++
1struct MeshInfo {
2    std::vector<glm::vec3> positions{};
3    std::vector<unsigned int> indices{};
4    std::vector<glm::vec3> normals{};
5    std::vector<glm::vec2> textureCoordinates{};
6    std::vector<glm::vec4> colors{};
7};
Then I would store these as binary files.
Now I could not do the same for textures, since if you were to dump the raw binary data for a texture, that file would become huge!
So instead I just copied the texture over to my asset folder and renamed its extension to “hide” the fact that it was just a png.
This does mean that technically loading my textures is slower than loading straight from binary (duh), but it was not a hurdle I encountered, so it did not matter.
Assets & AssetSystem
Since I wanted to do world streaming one thing I knew I would need is async loading. One thing a bit more special about my asset system is that it does not care about what asset it’s loading.
AssetManager
The task of the AssetManager is to get data from a file and transform it into a structure in memory.
Which means that anything that is serializable is immediately compatible with the AssetManager.
This is how I define my Asset structure:
c++
1struct Asset {
2    TypeID typeId{0};
3    void* instance{nullptr};
4    std::string name{""};
5    std::atomic_uint references{0};
6};
As you can see, we only store a void* to the actual instance, but we also store a TypeID to know what type it is.
We also store std::atomic_uint references, this is so that the AssetManager can automatically unload the asset when it is not in use anymore.
Locating assets
Let’s say you want the following api:
c++
1auto awesomeModel = LoadAsset("MyAwesomeModel");How would the asset system know where MyAwesomeModel is located?
You could add wildcards and have the following:
c++
1auto awesomeModel = LoadAsset("[models]/MyAwesomeModel");The asset system would know how to resolve the [models] and could then find the model.
I did not go that route, instead I decided to put all of my Assets into the same Data folder.
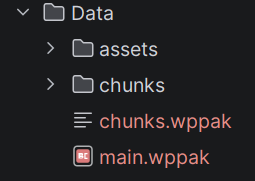
This means that all I need to do is to locate where the Data folder is relative to the executable. Which I did in the following way:
c++
1#if WASP_PACKAGED
2#define WP_BASE_DATAPATH std::string("Data/")
3#elif WASP_WIN
4#define WP_BASE_DATAPATH std::string("../../../Data/")
5#elif WASP_PS5
6///Super secret path that I am not revealing 😊
7#else
8#define WP_BASE_DATAPATH std::string("Data/")
9#endif
Now I will admit that this is definitely not a good long term solution. What I would actually do next time is probably just always copy the Data folder next to the exe (which I only did during packaging here). That way you can always just do “Data/Assets/”
Also as I mentioned earlier, I would still like wildcards in this scenario since they are still nice to use.
With that out of the way, my AssetManager would scan the "Data/assets" folder and any files ending in .wpsrc and .wppak would get added to its internal registry.
These formats are the ones I chose for json (wpsrc, Wasp Source) and binary (wppak, Wasp Packaged).
So after scanning you would have something like the following list:
json
1"awesomeModel": "Data/assets/awesomeModel.wppak"
2"anotherModel": "Data/assets/anotherModel.wpsrc"
Loading assets
For loading assets I provide the following API:
c++
1void* Get(const std::string& name, TypeID id);
2std::future<void*> GetAsync(const std::string& name, TypeID id);
3
4template<typename T> T* Get(const std::string& name);
5template<typename T> std::future<T*> GetAsync(const std::string& name);
6void Unload(const std::string& name);
As you can see we again have here both a templated and non-templated api. We also give the user 2 options:
- Load the asset synchronously (the thread has to wait until the asset is loaded).
- Load the asset asynchronously (the asset will be loaded on a separate thread via the JobSystem).
Both of these will first check if the asset is already loaded, if so they immediately return the already existing asset.
If not, the Get will load the asset on the same thread and then return the loaded asset.
c++
 1void* wasp::AssetManager::Get(const std::string& name, TypeID id)
 2{
 3    if (Asset* asset = GetAsset(name); asset != nullptr)
 4    {
 5        asset->references.fetch_add(1);
 6        return asset->instance;
 7    }
 8
 9    if (Asset* asset = LoadAsset(name, id); asset != nullptr)
10    {
11        asset->references.fetch_add(1);
12        return asset->instance;
13    }
14
15    return nullptr;
16}
The GetAsync will also first check if the asset is loaded first, if it isn’t loaded it will kick off a new job that will load the asset.
c++
 1std::future<void*> wasp::AssetManager::GetAsync(const std::string& name, TypeID id)
 2{
 3    decltype(auto) promise = std::make_shared<std::promise<void*>>();
 4    decltype(auto) future = promise->get_future();
 5
 6    if (Asset* asset = GetAsset(name); asset != nullptr)
 7    {
 8        asset->references.fetch_add(1);
 9        promise->set_value(asset->instance);
10        return future;
11    }
12
13    AsyncLoadJobParams jobParams{
14        promise,
15        this,
16        name,
17        id,
18    };
19
20    JobDeclaration loadJob{
21        LoadAssetJob,
22        jobParams,
23        JobPriority::HIGH,
24        nullptr,
25    };
26
27    JobSystem::KickJob(loadJob);
28
29    return future;
30}
We use std::future and std::promise here because it allows the user to continue on their merry way and check later if the asset is loaded or not.
The actual deserialization from the file is just our serialization system.
AssetHandle
Having to check if an Asset is loaded, calling load and calling unload can become quite tedious.
To aid in this problem I wanted to create a wrapper, which would do this all automatically, this ended up becoming the AssetHandle<T>
Taking inspiration from Unreal’s TSoftObjectPtr<T>, I wanted the following api.
c++
 1class Player {
 2public:
 3    Player() {
 4        _model.Load();
 5    }
 6    ~Player() = default; //_model automatically gets unloaded :)
 7
 8
 9    void Update() {
10        if (_model.IsLoaded()) {
11            _model->AwesomeUpdateCall(); //can still call the underlying type via the -> operator.
12        }
13    }
14
15private:
16    AssetHandle<Model> _model{};
17};
To achieve this we can create a new templated class, in it we can store the following:
c++
 1template<typename T>
 2class AssetHandle {
 3public:
 4    //...
 5
 6private:
 7    T* _instance{nullptr};
 8    std::string _assetName{""};
 9    std::atomic<AssetHandleState> _state{AssetHandleState::UNLOADED};
10    std::future<void*> _promisedInstance{};
11};
First we store a pointer to the instance for the -> operator.
Then we store an assetName so that we know which asset to load.
Then we store an atomic state:
c++
1enum class AssetHandleState : byte /*unsigned char*/ {
2    LOADING     = 0,
3    LOADED      = 1,
4    UNLOADED    = 2,
5};
For our -> operator we first check if the instance isn’t loaded, if so we call load.
c++
 1template<typename T>
 2class AssetHandle {
 3public:
 4    //...
 5
 6    //Note that this can still return a nullptr.
 7    T* operator->() {
 8        if (!_instance) Load();
 9        return _instance;
10    }
11
12private:
13    //...
14};
And finally for our load function we:
- first check if we aren’t already loading.
- else ask the AssetManager to load the asset async.
c++
 1void Load() {
 2    //Check if we are already loaded.
 3    if (_state.load() == AssetHandleState::LOADING) {
 4        //check if the promise is completed.
 5        if (_promisedInstance.wait_for(std::chrono::seconds(0)) == std::future_status::ready) {
 6            _instance = static_cast<T*>(_promisedInstance.get());
 7            _state.store(AssetHandleState::LOADED);
 8        }
 9    } else if (_state.load() == AssetHandleState::UNLOADED) {
10        //Ask the AssetManager to load the asset async.
11        _promisedInstance = AssetManager::GetInstance().GetAsync(_assetName, TypeInfo<T>::ID());
12        _state.store(AssetHandleState::LOADING);
13
14        //If the asset was already loaded, the promise would've already been completed so check it.
15        if (_promisedInstance.wait_for(std::chrono::seconds(0)) == std::future_status::ready) {
16            _instance = static_cast<T*>(_promisedInstance.get());
17            _state.store(AssetHandleState::LOADED);
18        }
19    }
20}
Editor
What is an engine without its editor?
a pain in the ass to work with.
The final thing we had to do content-wise, was to create an editor and make a level in it. Creating an editor is one of my personal favorites, since you finally translate your engine to a visual form.
And now you can show everybody your fancy editor, and everybody will say “Oh yeah it looks nice”.
As I’ve already previously mentioned, the editor for this engine is a library that the user can integrate.
c++
1wasp::Application app{};
2//..
3
4// To integrate the editor all you need to do is:
5wasp::Editor editor{};
6editor.AttachToApplication(app);
The Editor class
The Editor class is the class that manages all of the EditorPanels. It also handles some more stuff like the creation and deletion of EditorPanels and Playing / Pausing / Editing the game. Besides that it also stores some extra information such as the Selected Entity.
The EditorPanel class
So the editor itself doesn’t do a lot of logic, instead most logic is done in an EditorPanel. EditorPanels are the small windows inside of the editor, such as the viewport, scene overview, inspector, etc.
Each EditorPanel inherits from the base EditorPanel class which looks like this:
c++
 1class EditorPanel {
 2public:
 3    friend class wasp::Editor;
 4
 5    EditorPanel() = default;
 6    virtual ~EditorPanel() = default;
 7    WP_DEFAULT_CONSTRUCTOR(EditorPanel);
 8
 9    virtual void Initialize(void* userData) = 0;
10    virtual void RenderUI() = 0;
11    virtual void Render() = 0;
12
13    bool IsOpen() const;
14    void Close();
15
16protected:
17    wasp::Editor* GetEditor();
18    const unsigned int& GetID();
19
20    bool BeginPanel(const char *title, int flags = 0);
21    void EndPanel();
22
23private:
24    //...
25};
In order for the Editor to know about an EditorPanel, you must register it first.
c++
1editor.RegisterPanel<YourAwesomePanel>();
2
3//Then if you want to open it you can call:
4editor.OpenPanel("YourAwesomePanel");
Going over each panel and explaining how they are implemented is outside of this blog post. It’s already long enough and I won’t be covering this.
World Streaming
The engine’s most notable (and coolest) feature, world streaming. Basically what I wanted was the ability to create worlds as big as I would like. And the engine would then split the world into chunks and load/unload them as you move through the world. It should also create LODs so that we can still render the entire world even when it’s not all loaded into memory.
My main inspiration on how to do this was the Amazing talk: Marvel’s Spider-Man: A Technical Postmortem.
Chunks
Note: Insomniac refers to them as “Zones”, but everybody has played Minecraft so the term “Chunks” is more widely known.
So a Chunk is a 128m by 128m area of the world, which we can load and unload from memory when needed. Inside of that chunk we store all of the entities that live in the area that the chunk represents.
This also means that we don't save dynamic entities in a chunk.
These get saved in a separate file called main.wppak and these entities get created at startup.
Each chunk gets saved to its own file.
Every chunk stores the following things:
c++
 1class Chunk {
 2public:
 3    //..
 4
 5private:
 6    //its (grid) position.
 7    glm::ivec2 _position{0, 0};
 8    std::atomic<ChunkState> _state{ChunkState::UNLOADED};
 9    std::atomic_bool _dirty{false}; //if this chunk should be unloaded
10
11    SpinLock _promisedEntitiesLock{};
12    SpinLock _entitiesLock{};
13
14    std::vector<std::future<Entity>> _promisedEntities{}; //the entities that are in this chunk but aren't loaded yet.
15    std::unordered_set<Entity> _entities{}; // all the entities that are loaded and in this chunk
16
17    Entity _impostor{0}; //the entity that will hold the LOD mesh once the chunk is unloaded.
18};
As you can see we store 2 different vectors.
This is because the Scene can only create entities on the main thread:
c++
1class Scene {
2public:
3    //...
4    std::future<Entity> DeserializeEntity(Reader &reader);
5}
This is because the entities that are deserialized get put into a queue. Then at the start of each frame we go through this queue and create the actual entities and place them in the world.
I went this route so that the Scene doesn’t have to use locks to know when it can and can’t write to the world.
World
The World class is the class that manages all of the chunks and tells them to load and unload.
Each frame we go over every entity that has the ChunkLoader component:
c++
 1//Tag for entities which should load chunks.
 2struct ChunkLoader {
 3        int loadDistance = 1;
 4        // 1 =
 5        // x x x
 6        // x L x
 7        // x x x
 8        //
 9        // 2 =
10        // x x x x x
11        // x x x x x
12        // x x L x x
13        // x x x x x
14        // x x x x x
15        //etc
16    };
c++
 1//First we mark all chunks that are loaded as dirty.
 2{
 3    ScopedWriteLock lock{_chunksLock};
 4    for (auto& chunk : _chunks | std::views::values)
 5    {
 6        chunk->MarkDirty();
 7    }
 8}
 9
10//Then we go over every entity and load the proper chunks.
11for ([[maybe_unused]] Entity entity : view){
12    auto* transform = view.Get<Transform>();
13    auto* loader = view.Get<ChunkLoader>();
14
15    for (int y = -loader->loadDistance; y <= loader->loadDistance; y++)
16    {
17        for (int x = -loader->loadDistance; x <= loader->loadDistance; x++)
18        {
19            glm::ivec2 chunkPosition = Chunk::WorldToChunkSpace(transform->position);
20            chunkPosition.x += x;
21            chunkPosition.y += y;
22
23            {
24                //We keep track of chunks that don't exist on disk, these are "fake chunks"
25                //We keep track of them so that we don't try to continuously load them.
26                ScopedReadLock lock{_fakeChunksLock};
27                if (_fakeChunks.contains(chunkPosition))
28                    continue;
29            }
30
31            if (!IsChunkLoaded(chunkPosition))
32                LoadChunk(chunkPosition, scene);
33
34            ScopedWriteLock lock{_chunksLock};
35            if (const auto& it = _chunks.find(chunkPosition); it != _chunks.end() && it->second)
36            {
37                it->second->MarkClean();
38                it->second->ResolvePromisedEntities(scene);
39            }
40        }
41    }
42}
Our LoadChunk function will dispatch a new Job and load the chunk on a separate thread.
For generating the LODs I simply use the meshoptimizer library.
JobSystem
As you’ve seen before this, some parts of my engine are multithreaded, this is all thanks to my JobSystem. My JobSystem is basically an implementation shown in the Game Engine Architecture Book (Chapter 8.6.4 - Job Systems). With the API being incredibly similar:
c++
 1namespace JobSystem {
 2
 3       //Spawns `count` worker threads
 4       void SpawnWorkerThreads(int count);
 5
 6       //Stops all jobs and worker threads.
 7       void StopWorkerThreads();
 8
 9       //Kicks the job to the queue.
10       void KickJob(const JobDeclaration& declaration);
11
12       //Waits until the counter is 0, will run other jobs in the meantime.
13       void WaitForCounter(Counter* counter);
14
15       //Kicks the job and waits until its finished.
16       void KickJobAndWait(const JobDeclaration& declaration);
17}
Now one difference is that I save my JobParameters as an Any (my own implementation of std::any).
c++
1//Tip: Using a std::function here might be more useful instead of a plain function pointer.
2using EntryPoint = void(*)(Any params);
3
4struct JobDeclaration {
5    EntryPoint entryPoint{nullptr};
6    Any param{};
7    JobPriority priority{JobPriority::LOW};
8    Counter* counter{nullptr};
9};
In the SpawnWorkerThreads we push back count amount of threads to a vector.
Each thread will run the JobWorkerThread function which looks like:
c++
 1struct Worker {
 2    Fiber* scheduler{nullptr}; // Worker threads need a scheduler fiber, to launch more fibers.
 3    Fiber* running{nullptr}; // The current running fiber on this worker thread.
 4    JobDeclaration incoming; // the incoming job.
 5    Counter* waitOn{nullptr}; // On which counter the thread is waiting (can be nullptr, if it's not waiting on any counter)
 6    Handoff handoff{Handoff::NONE}; //whether to wait, recycle or do nothing with the previous fiber
 7};
 8
 9void wasp::JobSystem::internals::JobWorkerThread()
10{
11    Worker self{};
12    worker = &self;
13
14    Fiber* thisFiber = FiberSystem::ConvertThreadToFiber();
15
16    self.scheduler = FiberSystem::Create(FIBER_STACKS_SIZE, SchedulerFiber, thisFiber);
17
18    FiberSystem::RunFiber(self.scheduler);
19
20    FiberSystem::ConvertFiberToThread();
21
22    FiberSystem::Destroy(self.scheduler);
23}
The SchedulerFiber is a function that will take a job from the queue and run it.
We use Fibers instead of just plain threads because creating a fiber is relatively cheap and easier to manage.
Also we have more control of Fibers as we can schedule them ourselves instead of the OS doing it for us.
If you want to learn more about fibers I recommend these resources:
I do note that you will have to create your own implementation for every platform since Fibers are not in the Standard Library.
The SchedulerFiber function looks like this:
c++
 1void wasp::JobSystem::internals::SchedulerFiber(void* params)
 2{
 3    Worker* self = CurrentWorker();
 4
 5    while (running.load(std::memory_order_acquire))
 6    {
 7        FinalizePrevious(); //Either Pause, Recycle or do nothing with the previous fiber.
 8
 9        if (Fiber* fiber = PopReady())
10        {
11            self->running = fiber;
12            FiberSystem::SwitchTo(fiber);
13            continue;
14        }
15
16        JobDeclaration job = GetNextJob();
17
18        if (job.entryPoint)
19        {
20            self->incoming = std::move(job);
21            self->running = GetFreeFiber();
22
23            FiberSystem::SwitchTo(self->running);
24            continue;
25        }
26        workAvailable.acquire();
27    }
28
29    FiberSystem::SwitchTo(static_cast<Fiber*>(params));
30}
To know what job to run we have 4 queues:
- Low priority queue.
- Normal priority queue.
- High priority queue.
- Critical priority queue.
We simply just take the most important job as the next one:
c++
 1wasp::JobDeclaration wasp::JobSystem::internals::GetNextJob()
 2{
 3    ScopedLock scopedLock{lock};
 4
 5    for (int i = maxPriority; i >= 0; i--)
 6    {
 7        if (!jobQueues[i].empty())
 8        {
 9            JobDeclaration job = std::move(jobQueues[i].front());
10            jobQueues[i].pop_front();
11            return job;
12        }
13    }
14
15    return JobDeclaration{};
16}
Then if we want to add a job to the queue we just add that JobDeclaration to its respective queue.
And voilà! a JobSystem!
Conclusion
First I want to note that everything I’ve talked about here is not even the full engine. This blog only covers about 80% of the engine, but it is getting big enough.
But I am very very proud of what I’ve made. I have gotten quite fond of this project. Even though I was not able to technically hit all of my goals that I set at the beginning of the block. I am still more than satisfied with what I have been able to make.
Even though I was already quite familiar with many topics seen in this block, it was still a great exercise to put everything together and make it work.
Now I have lately been reading some very interesting things on C++ API design, which means that I would do a lot of things differently now. But I will have to wait for my next project to apply that.
Now as I mentioned in the beginning of the blog, one of my goals was to have Visual Scripting. I picked this goal, because I have a Proof Of Concept of a Visual Scripting language lying around and I wanted to use that.
Next block I will be turning that proof of concept into a real visual scripting language!
Anyways, I would like to thank you for reading (probably not all, but that doesn’t matter)! See you next time!